"And all I ask is a tall ship and a star to steer her by"
--John Masefield--
I have to agree with Al Placette when he said this is "one of the most beautiful and oft-quoted lines ever penned about sailing and the sea..."
If you have this extreme nostalgic feeling for this ancient art of navigation using the stars and the planets rather than a GPS, then you are not alone. At least I would be another one you can count on to share that feeling. Every time that I got to sail on a 14' dinghy or a 40' yacht, I felt that same feeling as if there was the wind of thousands years of sea going history blowing on my back. I imagined of all the courage, tragedy and triumph that people must had felt as they got lost on the high sea or able to make it to the destination.
This app is created out of a deep admiration for these ancient mariners. It is with the hope that it could help to do a little part in preserving this beautiful art of navigation, and may be, bringing us all a little bit closer to those courageous sea goers centuries before us.
Quick Links
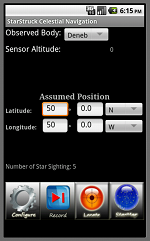
Choose Your WeaponsThe main function of this app is to help you calculate the most likely position given a series of star sighting. The resulting position is mapped in terms of latitude and longitude so that you may be able to find out where you are approximately.
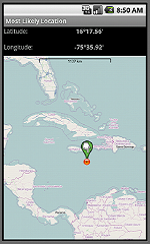
Most
likely position based on two or more star sightings
In order to help you to identify the visible stars for sight recording, a star map is available should you need it. If you are not familiar with a star map, it is used to display the altitude of the star and the azimuth from true north. The large circle around the stars represents the lowest point in the sky, which we call the horizon, and the center of the circle represents the highest point in the sky. This point is overhead of you and is also called the zenith. You are encouraged to learn how to read a sky map because it really helps you identify the stars and familiarize yourself with the night sky. The sky map is a tried and true method and it is as widely used today as by many generations before us in history.
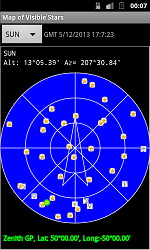
Star
map: the largest circle represents the horizon, the
center of the circle represents the zenith. True north
is at the top of the circle.
If you are already familiar with sextant navigation then continue with the reading, otherwise you can read the background section on celestial navigation to familiar yourself with the concept.
To determine your position you must perform a series of star sighting (I would recommend that you take at least three different stars but the more the better) and record the following information with the help of a sextant:
1. GMT time of the observations
2. Star name: SUN, MOON, Polaris, Sirius, Altair, etc.
3. Altitudes of the stars in degrees and minutes
4. Other info : eyes height above sea level, sextant index correction, lower or upper limb (required for the SUN and the MOON only)
The app allows you to enter all this information and it calculates the most likely position for you.
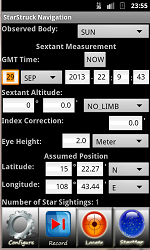
Star sight
input using data from a sextant
Since most of us may not have a sextant, I have tried to make use of the available sensors on most smart phones to help measure the altitude of the star by simply point the device to it. The sensor accuracy is within 1 degree so it is not as accurate as a good sextant but if you do several star sightings , then the error will average out and you will get a good fix of your position.
Star
sight input using integrated altitude measurement sensor
To use the integrated sensor for altitude measurement, click on Configure button and check on "Use Device as Sextant". For aiming purpose, I place the phone on top of a straw and look through the straw to see the star. When the star appears in the view then I press either the track ball or the volume control buttons to have its altitude recorded. Please note that when you are aiming at the SUN, make sure that you wear adequate shade protection for your eyes else the sun's radiation could result in permanent damage to your retina. Alternatively, you may be able to look at the shadow of your phone and try to minimize it while lining it up with the sun. This way you do not have to look at the sun directly.
When you start the app for the first time, the sensor altitude measurement is on by default unless you change it to manual sextant input by using the configure button.
Here are the main control buttons.

Set user preferences. Use this button when you want to enable the device to be used as altitude measuring equipment. If not then you will be asked to enter the sextant measurement manually. You also use the configure button when you want to clear the star sights stored in memory and start all over again for a new estimated position.

Start to record a star sight. The same function can be activated by pressing on the volume control buttons, or the track ball if your phone has one. Every recorded star sight will be saved in memory. You will need to record at least two star sights before you can get a fix on your location. The more star sights you record, the more accurate the calculation will be.
 Calculate your most likely position based on at
least two or more recorded star sighting. You would use this button
after you have already recorded two or more star sightings.
Calculate your most likely position based on at
least two or more recorded star sighting. You would use this button
after you have already recorded two or more star sightings.
 Show the map of all visible stars as seen from
the most likely location of your
phone or from a manually entered location
. You can change the star map location setting using the
star map menu (Starmap screen > Menu > SetLocation). By
default star map uses the current time on your phone but you can also change it to another time
that you prefer (Starmap screen > Menu > SetTime).
Show the map of all visible stars as seen from
the most likely location of your
phone or from a manually entered location
. You can change the star map location setting using the
star map menu (Starmap screen > Menu > SetLocation). By
default star map uses the current time on your phone but you can also change it to another time
that you prefer (Starmap screen > Menu > SetTime).
Note: if you are using the integrated sensor as a sextant then it is assumed that you are aiming for the center of the observed body. Therefore, the limb setting will always be set to "NO LIMB ".
User Preference:
| Setting | Default |
| Enable Device Sensor as Sextant Input | ENABLED |
| Starmap AP (used assumed position for starmap) | DISABLED |
| Starmap CCW Azimuth | DISABLED |
| Local GMT Offset | AutoDetect |
Note 1: By default, StarStruck displays the starmap with the star's azimuth increasing clockwise. Some users may prefer the stars to be displayed counter clockwise instead.
Note 2: By default, StarStruck will try to detect your GMT offset automatically based on the phone information. Some user from region of the world where the GMT offset is fractional had asked for a manual GMT offset setting to override the auto detect setting. You can overwrite 'AutoDetect' GMT setting with your own local GMT offset like this, e.g. +5 or +1.5 or -4, etc.
There are a number of features available to support more advanced users. These are:
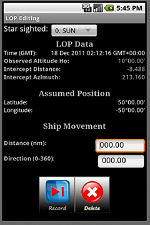
1. LOP editing: allows the user to review all the LOP data captured from all the star sights recorded. The user would be able to delete the LOP or edit it to account for ship movement.
You can review the LOP information about any star sight in memory using LOP Editing (accessible via Menu > LOP). Modification to the LOP based on ship movement can be added via the ship movement data input dialog and Record button. One can also delete an LOP via Deletebutton.
|
LOP Editing |
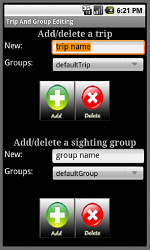
2. Trip editing: This feature is accessible via Menu > TRIP. A user can organize all the star sight records into groups for each trip. That is, a user may have many trips and each trip may have many groups of star sighting records. Normally a group would corresponds to a geographical location that the user is trying to ascertain its coordinate.
A trip may contain one or more groups of star sightings. Trip editing allows for the addition/removal of a trip and for the addition/removal of a group(s) within a trip. You can set the active trip and group to work with using the Config button.
Trip and group may be confusing for some user so let do an example. Said if you are going to go from NewYork to Sydney, Australia, then at the beginning of the trip you would go into Menu > Edit Trip and add a trip called NewYorkToSydney. Then, as you travel along the way and you want to find out the locations of your ship over time, let say location #1 to location #10. To determine each of the ship's locations you would have to take two or more star sightings per location. Each group of sightings per location is what the app refered to as a group. In this example you would have to create 10 groups to hold the sighting for your 10 locations. In summary, you created one trip called NewYorkToSydney, and 10 groups to hold the star sighting for this trip. Note that using trip and groups allows you to organize and save your sightings so that you may review them at a later time.
If you have no interest in saving the star sightings then there is no need to bother with creating trip and groups, especially if it causes you confusion.
By default StarStruck saves every sighting to the group named "defaultGroup" under the trip named "defaultTrip" . If you don't plan to go on any trip and save many sightings along the way then there is no need to add any more trips or groups. The default should be just fine.
|
Trip Editing |
3. Offline map: our app supports offline map which is helpful when the Internet is not available. Since offline map of the whole world is very large, the app includes only a very high level offline world map in order to keep the application small in size. However, a user who has a device with large enough external storage can download the map on his own time to support offline navigation.
In order to download the offline maps for your needs, first install the application Mobile Atlas Creator (MOBAC) on your PC. This is a freely available program available over the net ( http://mobac.sourceforge.net). The program allows you to define a map area, a map source (choose OpenStreetMap mapnik) and an atlas format (choose osmdroid ZIP ). Then you can download the map zip file and place it on your sdcard under the directory /sdcard/osmdroid. There after even if you don't have the Internet, StarStruck will still be able to display the map for you. To improve the speed of the map display you may want to unzip the map file to /sdcard/osmdroid instead so that StarStruck doesn't have to spend the effort in unzip it every time a map is needed.

|
Mobile Atlas Creator |
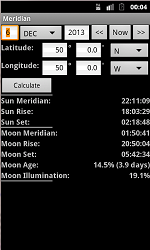
4. Meridian passage, rise and set time: This feature is accessible via Menu > Meridian. As it happened quite often a user would want to know what time the Sun or Moon would pass over head (meridian passage) or when it rises or set at his location for different reasons. This feature provides for a quick look up of this information.
|
Meridian Passage |
5. Magnetic variation: This feature is accessible via Menu > GyroError. Knowing the magnetic variation of the compass allows the user to correct the compass reading to find true north. Since the difference between true north and the magnetic compass is the magnetic variation, one just need to add the magnetic variation to the compass reading to find the true north.
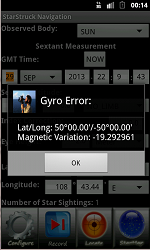
|
Gyro Error |
The accuracy of the computed likely position is depending on your measuring equipment. According to Wikipedia:
"Professional sextants use a click-stop degree measure and a worm adjustment that reads to a "Minute of arc", 1/60 of a degree. Most sextants also include a vernier on the worm dial that reads to 0.2 minute. Since 1 minute of error is about a nautical mile, the best possible accuracy of celestial navigation is about 0.1 nautical miles (200 m). At sea, results within several nautical miles, well within visual range, are acceptable. A highly-skilled and experienced navigator can determine position to an accuracy of about 0.25-nautical-mile (460 m)."
Rather than writing a complex
mathematical tutorial on celestial navigation and
perhaps turn away 90% of the users
permanently, let me start by saying that celestial navigation is another way
of determining your position on earth by using the stars as
your light houses .
Please note that I am using the term star loosely
here to mean the Sun, the Moon and the planets as well.
Most of us are familiar with the concept of the light house as it is a mean to help people at sea to determine their position and find their way to a safe port. By keeping track of light houses along your route on a map and follow them, one should be able to get to his destination without much trouble.
Now let's suppose that someone has given you a map of exactly what stars are visible in the sky for any location on earth. Then, for sure you should be able to look up in the sky and compare the visible stars to your map and figure out your approximate location, wouldn't you?
I am glad you answered 'yes' because that showed me you have understood the very fundamental principle of celestial navigation. If you have answered 'no', please have a coffee and think about it again. I am not taking no for an answer here :)
In the past, the map of the stars in the sky is contained in huge volumes of scary books called the Nautical Almanac. Different volumes also have strange names like HO 229 or HO 246. Learning how to use these books really took the fun out of celestial navigation and reduced it to just a laborious boring work that is susceptible to human errors and frustration. Sure, in the old day it was a good idea to keep this science a secret so that only the captain and his first mate knew how to navigate the ship, rendering any thought of mutiny among the crews unthinkable. But today there is no need for such a secret and we want to make it easy so that more people can learn to appreciate celestial navigation. Otherwise, this beautiful ancient art would not be able to prosper.
A navigator who was armed with these scary books would use his sextant to measure the altitudes of different stars (this is call star sighting). He also records the time for each sighting. Using the recorded observation times and altitudes, he would be able to look up in the big books to find out approximately how far he is from an arbitrarily assumed position.
Since I have suffered through this process before, I tried to create this application to do away with all these books and their table look up. When you are using this Celestial Navigation application, all the tables look up and calculations are done for you automatically. All that you have to do is to enter the sighting time, the star altitude and your assumed position. The software takes care of the rest and gives you your approximate location at the end.
For those who are technically inclined, I would recommend the reading of "Celestial navigation for dummies" by onboardintelligence.com.
I think any discussion about celestial navigation wouldn't be completed without mentioning a little bit about the history of the sextant and our good old watch. These are two key devices without which celestial navigation cannot work. I hope that you will find it as fascinating as I do.
The sextant probably has a history as old as when the first human being began using the stars for his navigation. That is to say we don't really know exactly when it all began.
One thing that we knew is that as early as a thousand years ago, people had been using the altitude measurement of Polaris for getting back to their home ports. To begin, the sailor would record the altitude of Polaris at his home port. Then, to return after a long voyage, he needed only to sail north or south, as appropriate, to bring Polaris to the altitude of the home port, then turn left or right as appropriate and "sail down the latitude," keeping Polaris at a constant angle.
The Arabs knew this technique well and they introduced two important instruments that helped to measure the altitude of the stars - the quadrant and the astrolabe.
 |
Astronomers Astrolabe. Arabic astronomer's astrolabe was used to find the time of rising and setting of the sun and the altitude of the sun and selected stars. Importantly, it was used to find the direction of Mecca for the devout Moslem's morning and evening prayers. |
In the word "astrolabe" - "astro
means 'star' and "lade" roughly translates as 'to
take' or 'to find'. In order to use the astrolabe, the navigator would
hold the instrument by the ring at the top. This caused the instrument
to remain in a vertical plane. He would align the plane of the
astrolabe to the direction of the object of interest. The alidade was
aligned to point at the object and the altitude was read off the outer
degree scale. The problem with the astrolabe was that it has
to be suspended vertically for angle measurement. This was okay on land
but on a ship in a rough sea this became a problem.

DIY Astrolabe. You
can build an astrolabe like this. This one is made
out of a bottom of a plastic barrel, a paper protractor, a camera
tripod, a straw and some metal pieces. I used to track the Sun
around my home with this one. It was great fun.
Similar to the astrolabe, the mariner's quadrant - a quarter of a circle made of wood or brass came into widespread use for navigation around 1450, though its use can be traced back at least to the 1200s. The quadrant is simpler than the astrolabe in that it is only quarter of the astrolabe in size; however it shares the same limitation of the astrolabe that it cannot be used on windy water.

|
Mariner's brass quadrant. The scale spans 90 degrees and is divided into whole degrees. A plumb bob establishes a vertical line of reference. The quadrant shown here is a replica of the type Columbus might have used on his voyages to the New World. |
During the 1400's, Portuguese explorers were traveling south along the coast of Africa searching for a route to the orient. As a seafarer nears the equator heading south, Polaris disappears below the horizon. So, in southern seas, mariners had to have a different way of finding their latitude. Under orders from the Portuguese Prince Henry, The Navigator, by 1480, Portuguese astronomers had figured out how to determine latitude using the position of the sun as it moved north and south of the equator with the seasons, what we now call its "declination." In simple terms, the navigator could determine his latitude by using his quadrant to take the altitude of the sun as it came to its greatest altitude at local apparent noon, and then making a simple correction for the position of the sun north or south of the equator according to the date.
The next step in the evolution of celestial navigation instruments was the cross-staff, a device resembling a Christian cross. The cross-staff is made up of two pieces - the vertical piece, the transom or limb, slides along the staff so that the star can be sighted over the upper edge of the transom while the horizon is aligned with the bottom edge.
 |
A cross-staff. This one is a modern reproduction in the style popular with Dutch navigators in the eighteenth century. |
The navigator places one end of the main staff against his cheek just below his eye. He sights the horizon at the end of the lower part of the transom, adjusting the cross arm on the main arm until he or she can sight the sun at the other end of the transom. The altitude can then be determined by reading the position of the transom on the scale on the main staff. This value was converted to an angular measurement by looking up the value in a table.
 |
A cross-staff in use This drawing, from a Spanish book on navigation published in 1552, shows how the cross-staff was used to determine the altitude of Polaris. If you've ever heard the phrase "shooting the stars," it comes from the practice of holding a cross-staff up to the user's eye with one hand, with the transom grasped in the other hand so that the person looks like an archer taking aim at the sun. |
The major problem with the cross-staff was that the observer had to look in two directions at once - along the bottom of the transom to the horizon and along the top of the transom to the sun or the star. Again, not an easy feast on a rolling deck!
 |
Davis quadrant. Made by an English craftsman named Walter Henshaw in 1711. It's made of rosewood with a diagonal scale on boxwood. |
The backstaff or back-quadrant
is another evolution in the design of celestial altitude measurement
instrument, in particular the altitude of the sun. When observing the
sun, users kept the sun to their back (hence the name) and observed the
shadow cast by the upper vane on a horizon vane. It was invented by the
English navigator John Davis that described it in his book Seaman's
Secrets in 1594. It was called a quadrant because it could
measure up to 90 degrees, that is, a quarter of a circle. The observer
determined the altitude of the sun by observing its shadow while
simultaneously sighting the horizon. Relatively inexpensive and sturdy,
with a proven track record, Davis quadrants remained popular for more
than 150 years; even after much more sophisticated instruments using
double-reflection optics were invented.
One of the major advantages of the Davis back-staff
over the cross-staff was that the navigator had to look in only one
direction to take the sight - through the slit in the horizon vane to
the horizon while simultaneously aligning the shadow of the shadow vane
with the slit in the horizon vane.
The majorproblem with
back-sight instruments was that it was difficult if not impossible to
sight the moon, the planets or the stars. Thus, toward the end of the
1600's and into the 1700's, the more inventive instrument makers were
shifting their focus to optical systems based on mirrors and prisms
that could be used to observe the nighttime celestial bodies.
The critical development was made independently and almost simultaneously by John Hadley in England and by Thomas Godfrey, a Philadelphia glazier, about 1731. The fundamental idea is to use of two mirrors to make a doubly reflecting instrument - the forerunner of the modern sextant .
 |
Diagram of sextant |
In order to use a sextant, one would hold the
instrument vertically and point it toward the celestial body. Sight the
horizon through an unsilvered portion of the horizon mirror. Adjust the
index arm until the image of the sun or star, which has been reflected
first by the index mirror and second by the silvered portion of the
horizon mirror, appears to rest on the horizon. The altitude of the
heavenly body can be read from the scale on the arc of the instrument's
frame.
Like the Davis quadrant (also called backstaff),
the sextant allows celestial objects to be measured relative to the
horizon, rather than relative to the instrument. This allows excellent
precision. However, unlike the backstaff, the sextant allows direct
observations of stars. This permits the use of the sextant at night
when a backstaff is difficult to use. For solar observations, filters
allow direct observation of the sun.
A sextant does not require a completely steady aim, because it measures a relative angle. For example, when a sextant is used on a moving ship, the image of both horizon and celestial object will move around in the field of view. However, the relative position of the two images will remain steady, and as long as the user can determine when the celestial object touches the horizon the accuracy of the measurement will remain high compared to the magnitude of the movement.
 |
A very nice looking modern sextant. |
 |
John Harrison H1 clock |
To
navigate, seafarers could determine their latitude by using a sextant
to observe the position of the sun at midday or bright stars at night.
And, by tossing a weighted rope off the ship and counting how many
knots passed through one's hands in a given period of time, a rough
estimate of speed could be obtained. But it's of limited value to know
that you're traveling southeast at 7 knots, 50 degree north of
the equator, if you have no idea whether you're closer to Newfoundland
or Ireland. That is, what longitude are you on?
The
key, as everyone realized, was being able to tell what time it is both
at one's current location and at some other reference point on the
planet (say, Greenwich). Because the speed of the planett's rotation is
known (about 15 degree per hour), if you know what time it is
at a given longitude relative to Greenwich, you can do some
simple math, and end up with your position.
Unfortunately, it
wasn't easy to design an accurate clock. That is, at least in the 15th
and 16th centuries. The pendulum clocks at the time was no good in the
rocking sea. They were insufficiently accurate to navigate with any
certainty, and this all too often led to disaster.
There
being no apparent solution to the problem, mariners simply lived with
this frustration. But on a foggy day in 1707, four large British
warships returning from France misjudged their longitude and ran
aground on the Scilly Islands off the southwest tip of England. The
ships all sank and more than 2,000 men died. As a result, in 1714, the
British government offered a huge cash prize (20,000 British pound -
equivalent to millions of pounds or dollars in today's money) to the
first person who could devise a way of accurately measuring longitude
at sea. To win the prize the person must contrive a means of resolving
position at sea to within 30 nautical miles after sailing to the West
Indies. This required a clock that could keep time to within 3 seconds
per day.
For
half a century, all manner of charlatans and pseudo-scientific
crackpots tried to claim the prize, but none could solve the
fundamental scientific problem of determining longitude at sea. During
this time, John Harrison (1693-1776), a woodworker and musician from
Lincolnshire, devoted his life and genius to solving the problem.
Through
intuition and sheer effort he developed a clock, a maritime chronometer
that kept time accurate to one second per day. Harrison's chronometer
was a great advance for maritime navigation overcoming the harsh
environmental conditions encountered at sea. Using a copy of Harrison's
clock, Captain James Cook mapped the Polynesian islands and the Pacific
Ocean regions. He wrote in his log book great praise for the new
navigational instrument, "our trusty friend the watch" and "our never
failing guide." It is a shame that the skeptical British Parliament
kept denying Harrison his prize until he was in his eighty.
Nevertheless, it was still better late than never.
Over
time, clocks have improved dramatically and needs have changed, so GMT
has evolved to UTC. The acronym UTC is an English-French mixture for
Coordinated Universal Time. UTC is based on a definition of the second
that is nearly a million times more accurate. Under the general
umbrella of la Convention du Metre, this new second
is based on a quantum resonance within a cesium atom.
It is interesting to note that with today technology our time keeping precision has improved tremendously. The current best accuracy for the determination of the second, as announced by the US in 2014 - the NIST-F2 clock, results in a time error of only plus/minus 1 second every 300 million years. While this is so much more accurate than Harisson's chronometer but we shall always pay tribute to the first man who had lifted the art of navigation to another level of precision which was so critically needed.
|
Time keeping important dates: |
|
| Time | Event |
| 3500 BC | Egyptian obelisks and sundials |
| 2000 -1500 BC | Mayan calendar |
| 1900-1600 BC | Stonehenge |
| 400 BC -1600 AD | Aztec Calendar |
| 1094 | Sung Su's water clock perfected |
| 1583 | Galileo discovers pendulum period constancy |
| 1656 | Huygens pendulum clock |
| 1736 | Harrison H1 chronometer tested at sea |
| 1918 | quartz crystal oscillator developed |
| 1944 | Essen and Parry start keeping time with cesium atomic clock |
| 1948-49 | Lyons develops first atomic clock (ammonia) |
| 1978 | First GPS Block 1 satellite launched |
| 1993 | GPS declared operational and GPS clock available world wide |
In order to help identify the stars in the night sky, people have been relying on prominent objects of the night sky (e.g., the Big Dipper, the Orion and the Southern Cross) to help them quickly identify the nearby constellations and stars. This method of star identification is helpful to both the beginners as well as the experts as our night sky can be very complex and one can easily forget how things are heavenly arranged. Hopefully, this small write up can help someone to get a handle on the night sky.
The Big Dipper:
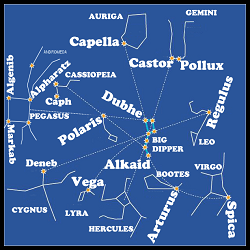 |
Big Dipper Sky Map |
The Big Dipper is a prominent group of stars in the northern sky and is very readily recognizable. It looks like a bowl with an arching handle. It is circumpolar (never setting below the horizon) and therefore visible in northern skies year-round. If you can find the Big Dipper in the sky, you have a starting point for identifying many other stars. As you can see from the diagram, numerous other stars can be found based on the position of the Big Dipper. Let us see how we can identify a few of these stars.
1. "The Pointers" - The two stars forming the pouring edge of
the Big Dipper's bowl (on the side away from the handle) point to
Polaris, the north star, in the constellation Ursa Minor. Polaris is a
rather faint star about five times farther away than the distance
between the pointers themselves.
Note 1: No matter where you are in the northern hemisphere, when you
face Polaris you will be facing north.
Note 2: Polaris marks north more accurately than a magnetic compass.
Note 3: The angle between your horizon and Polaris is equal to your
latitude on earth.
2. If you continue on this line from the Pointers on past Polaris, at an equal distance opposite the Big Dipper, you will intersect Cassiopeia. Cassiopeia is a W-shaped constellation that is home to the stars Calph and Shedir.
3. Trace a line from the Pointers of the Big Dipper to Polaris and past Cassiopeia, and you will come to a large, nearly perfect square of four stars called the Great Square of Pegasus. Some refers to Pegasus as "the door to Paradise" because the Milky Way is right behind it.
4. "Follow the Arc to Arcturus" - Follow the curve of the Big Dipper's handle away from the bowl to the fourth brightest star in the sky, Arcturus, of the ancient constellation Bootes.
5. "And Speed on to Spica" - If you extend the curve by another Dipper length from Arcturus then you will meet Spica that is in the large zodiac constellation Virgo.
The Orion:
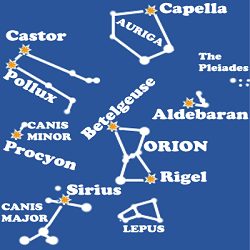 |
Orion Sky Map |
After the Big Dipper, Orion is ranked as the most distinctive group of stars in the heavens. Rigel is the brightest star in Orion followed by Betelgeuse. The three stars in the middle of Orion form a "belt" of the Orion constellation.
1. If a line is formed by the Orion's belt is extended 20 degrees down to the left then you will find Sirius, the brightest star in the night sky.
Note: if you hold your fist at arm length then it is approximately equal 10 degrees, so 20 degrees would be two fists at arm length. On the other hand, 1 degree is about the size of your little finger held at arm length. This is an useful fact to know as it helps you to measure the stars' relative locations when a more precise measuring instrument is not available.
2. For an equal distance (20 degree) in the opposite direction, the Orion belt points to Aldebaran, the first-magnitude yellowish orange star. Then, if this pointer is extended another 15 degree then you would meet the beautiful cluster of stars known as the seven sisters - the Plaeiades.
3. If a line from the middle of the belt, passes the middle of Betelgeuse and Bellatrix, and extends for another 45 degrees from there then you will meet constellation Auriga. It is home to the star Capella - the second brightest star of the night just behind Sirius.
4. If you trace a large curve from Capella to Sirius on the left of Orion then you would meet three other bright stars of the night: Castor, Pollux and Procyon.
The Southern Cross:
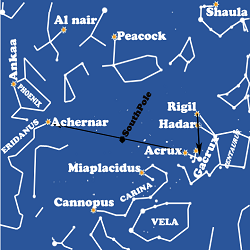 |
Southern Cross Sky Map |
To find the stars in the southern sky, one usually try to locate the Southern Cross first and use it as the anchor point. Although the Southern Cross is small and not as prominent as another constellation like Centaurus, it is distinctive enough to serve as a constant point of reference.
1. To locate the Southern Cross, you would trace a line that passes through Rigil Kentaurus and Hadar of the constellation Centaurus to Gacrux where Gacrux is the star at the top of the cross.
2. Once identified, the Southern Cross can be used to locate the South Pole which is the pivot point around which all the stars orbit in the southern sky. To find the South Pole, one draw a straight line between Acrux and Achernar. Then, bisect the line. The mid point of this line is approximately the South Pole.
3. The Carina constellation, known as the keel, can be located on the lower left side of the Southern Cross. Carina is the home of the stars Cannopus and Miaplacidus.
4. The Phoenix constellation, home to the star Ankaa, can be found by extending the line from the Southern Cross through Achernar. Phoenix is just about 5 degrees from Achernar.
Please note that although the stars do not change in their positions, because our earth is constantly spinning and orbiting, we see the stars "move" from time to time as we look up toward the sky (it is like when we are inside a moving car and looking out the window, we see that all the buildings around us "move" backward). Our maps of stars constantly rotate and move higher or lower in the sky from one season to the next. What is important for us to remember is that the relative positions of the constellations and stars do not change; therefore, we can always use our star maps for guidance even if the stars appear to move.
Although this application has the ability to use
the device sensor software to help you measure the star's altitude, its
accuracy is only within a degree. This is a handy feature when you are
without a sextant but if you have a sextant available then by all mean
use it instead. For a budget user I would recommend the following:
1. Casio G-Shock watch ($80): this watch is
excellent, it is water resistant and shock resistant. It doesn't need a
battery (it uses solar power). Its time is always adjusted to the
referenced atomic clock signal daily and it can display the time in GMT
so you don't have to do any conversion.
2. Davis Mark 25 sextant ($200): this is an inexpensive sextant yet its accuracy is up to 2/10 minute of arc. Many seasoned navigators have recommended this sextant for its accuracy and durability.
When you are on the water, also make very sure that all your electronic equipments are well protected. I would recommend you to buy a waterproofing case for your Celestial Navigation device. I had gone into the water with my phone before - not by choice - so I know it could happen to any body. If you are going on a long voyage, make sure you bring along a solar charger for it just in case your battery run out and you are stranded on a deserted island. :)
-------0--------
Please report any problems by mail to starstrucknavigation@gmail.com . Emailing is more helpful for me than reporting
them on the market. I am always looking for ways to improve the
application so I will study all of your comments and I'll try
to work them into the application in the later releases. My
aim is to make celestial navigation fun and easy so I tried hard to
leave out anything that is cryptic and mathematically cumbersome. I
hope that the application is simple to use while still keep it relevant
to an advanced user.
Thank you for using StarStruck Navigation.
I appreciate any donation to help fund this work and keep the price affordable for everyone. Thank you.